Angular is known as one of the most popular front-end JavaScript frameworks created by Google to help developers build scalable enterprise-grade web applications. Sometimes these application sizes could go large because of requirements and this also affects applications’ performance/ load time.
In order to reduce the load time and enhance the overall experience for users, Angular development services providers use a technique which is known as lazy loading. This native Angular feature is very useful in terms of performance as it allows users to load only the required bits of web application based on priority and then it loads other modules as and when needed.
Here in this article, we will learn about the lazy loading feature module in Angular, what is NgModules and how to import NgModule from Angular, how lazy loading works, how the lazy load feature module is used in a new Angular project, and how it is beneficial to speed up a web application.
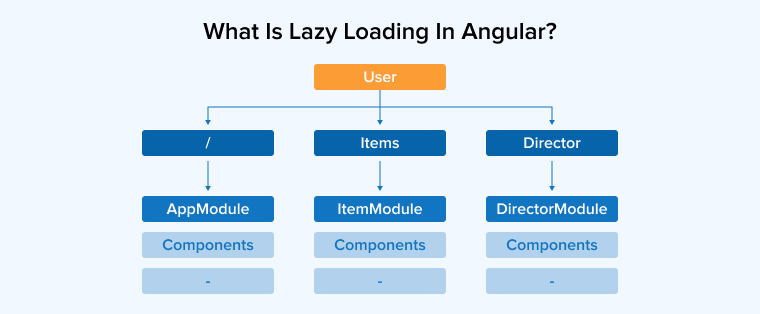
1. What is Lazy Loading in Angular?

Lazy loading features of Angular refer to the technique of loading all file-loaded webpage elements only when they are required. Fetching all images, videos, CSS, and JavaScript code eagerly might mean long load times — bad news for users.
Lazy loading is often used in the web app when there are many images and videos/media on the network tab of a website. The lazy loading feature loads the elements in the site based on their location on the page as and when the user scrolls into the view. This feature helps to avoid using a lot of bandwidth and bogging down page views on the network tab.
Angular is a Single Page Application (SPA) framework that completely relies on JavaScript for most of its functionalities. As the application grows the app’s collection of JavaScript can easily become large. Eventually, it corresponds to increasing the data usage and its load time. In order to speed up things, you can use lazy loading which is required to fetch the modules which are on top of priority and defer the loading of other modules unless and until they are required.
2. What are NgModules?
There are some Angular libraries such as RouterModule, BrowserModule, and FormsModule are NgModules. Angular Material, which is a third-party tool, is also a type of NgModule from the Angular core. NgModule from Angular core consists of files and code related to a specific domain or that have a similar set of functionalities.

A typical NgModule file declares components, directives, pipes, and services. It can also import other modules that are needed in the current module. One of the important advantages of NgModules is that they can be used for lazy loading modules. Let’s have a look at how we can configure lazy loading.
3. Steps to Implement Lazy Loading
Below are steps to implement lazy loading in Angular application.
Step 1: Create a Module and a Separate Routing File
Independent routing module is used to handle all the components of Angular 11 lazy loading modules. Use the following command to create a module and a routing file, namely, lazy-loading:
ng g m lazy-loading –routing |
import {Routes, RouterModule} from '@angular/router'; import{HomeComponent} from './home.component'; const routes: Routes = [ {path: '', component: HomeComponent} ]; @NgModule({ imports: [RouterModule.forChild(routes)], exports: [RouterModule] }) export class HomeRoutingModule {} |
The user should begin creating a module in the beginning because the lazy loading of a single component is not possible. This happens because of the structure of Angular. A module in Angular refers to a collection of components. In other words, an Angular module is a container defining all the components, services, pipes, etc., that it holds. The module declares a set of dependencies.
In the application, all these dependencies constitute a chunk, which is nothing but a transpiled JavaScript code. The main chunk consists of modules that are imported directly from the package, whereas from a separate chunk, the modules are lazily loaded. A point to consider is that modules form a chunk whereas components don’t. This is the reason why lazy loading of a single component is not possible.
Step 2: Create a Component
In this step, we will create a component within the lazy loading module. You may consider the example of a social media website. Let’s say, there is a route ‘/user-dashboard’ to display the UI of the user’s dashboard with an option to create a new post as well as display the user’s older posts and other activities. Let’s create a component for this and call it a user dashboard. Here is the command that you can follow:
ng g c user-dashboard |
Step 3: Add the Link to the Header
Now, after creating a component, it’s time to add a link to the header. The link must be added on the route that needs lazy loading to be implemented on it. And in this case, if the developer wants to have only the ‘user-dashboard’ component to get a lazy loaded module when the corresponding Angular route is active, adding the below-given link to the header is essential and this can be added in the ‘/user-dashboard’ route.
Here is the required snippet in the app.component.html –
<a routerlink="/user-dashboard">Dashboard</a> |
Step 4: Implement Lazy Loading with LoadChildren
Now it’s time to implement lazy loading with loadChildren and for that here we will have lazy load components that are displayed on the ‘/user-dashboard’ route with the use of loadChildren, loading in Angular. The implementation of this can go in two different ways –
- Using Promise
The very first method is using promise. Here in the below-given code, we will have a look at how the developers can implement lazy loading with loadChildren by writing the code with syntax that is promise-based. And to do so, below given are the changes that need to be made in-app-routing.module.ts:
{ path: 'user-dashboard’, loadChildren: () => import('./lazy-loading/lazy-loading.module').then(m => m.LazyLoadingModule) } , |
Here, in the code, the ‘/user-dashboard’ is mentioned in the route as the path property’s value. Besides this, there is something to note here in the import statement, the lazy loading module created is loaded. And in the above code, the use of a promise-based syntax is done to declare which const routes must be lazily loaded with the use of the lazy-loaded module. Here, the Angular routes that are lazily loaded are added to the property named loadChildren as shown in the code. And, the promise method is very basic for advanced versions like Angular 14, an easier coding style is really important.
- Using Async
Async can be used instead of promises to make the code simpler, more readable, and more presentable. The same code can be rewritten using async as follows:
const navigateRoutes: Routes = [ { path: 'lazy', loadChildren:async()=(await import('./lazy-loading/lazy-loading.module’)).LazyLoadingModule, } , ] ; |
The main difference between the first code that uses .then() and the second code that uses async() is that the .then() is discarded with the use of await the return value from await import(…). While on the other hand, rather than using then(), referencing LazyLoadingModule directly and mentioning LazyLoadingModule in a single line second code is written.
Step 5: Setting Up the Route
The last and final step is to set up the lazy loaded route, module and for that, the following code in the user-dashboard-routing.module.ts file is used –
import { NgModule } from '@angular/core'; import { RouterModule, Routes } from '@angular/router'; import { UserDashboardComponent } from './user-dashboard/user-dashboard.component'; const navigateRoutes: Routes = [ { path: '', component: UserDashboardComponent } ]; @NgModule({ imports: [RouterModule.forChild(routes)], exports: [RouterModule] }) export class UserDashboardRoutingModule { } |
4. Verify Lazy Loading in Angular
After implementing the lazy loading module, it’s time to verify the Angular application which is lazily loaded. Once the developers lazily load the application and run it, they will be able to notice that the lazy loading module that they added is loaded only when the route ‘/user-dashboard’ is hit. And this method is known as the simplest manual method to verify the lazy loading for an application created in Angular. Another method is to generate a build and check out the output. For this the developers will have to use the following command –
npm run build |
After running this command, one can have a look at the last lines of the output which clearly defines that separate lazy chunk files are generated. Besides this, another method to verify lazy loading is to open and check the dist folder.
When it comes to lazy loading, it is always advisable to lazily load all or at least most of the application modules whenever the developed app has a lot of them.
5. Summary
As seen in this blog, when it comes to smaller web applications, it might not matter much if all the modules of the application are loaded at once or not. But when the applications are huge and are carrying out major business transactions, it is really helpful to have separate modules which can be loaded as and when required. And for this, the lazy loading method is used as it can help to reduce the load time of the websites which can be helpful to get the client’s business site rank higher in SEO.

Comments
Leave a message...